How to Add a Photo to a Contact on Samsung Galaxy A57 with One UI 8.5
Adding a photo to a contact means editing the contact, opening its Picture tab, and picking an image from the Gallery. On this phone the first attempt stalls on photo permission: Contacts needs “Always allow all” for photos and videos before a picture can be chosen. The recording fixes that in Settings, then picks a picture and saves the contact.
- DeviceSamsung Galaxy A57
- SystemOne UI 8.5
- AppContacts
- Also works onOther Samsung Galaxy phones running One UI 8.5
- Last verifiedNovember 17, 2026
Every screenshot below is taken from the actual recording on this device — no stock images.
Steps
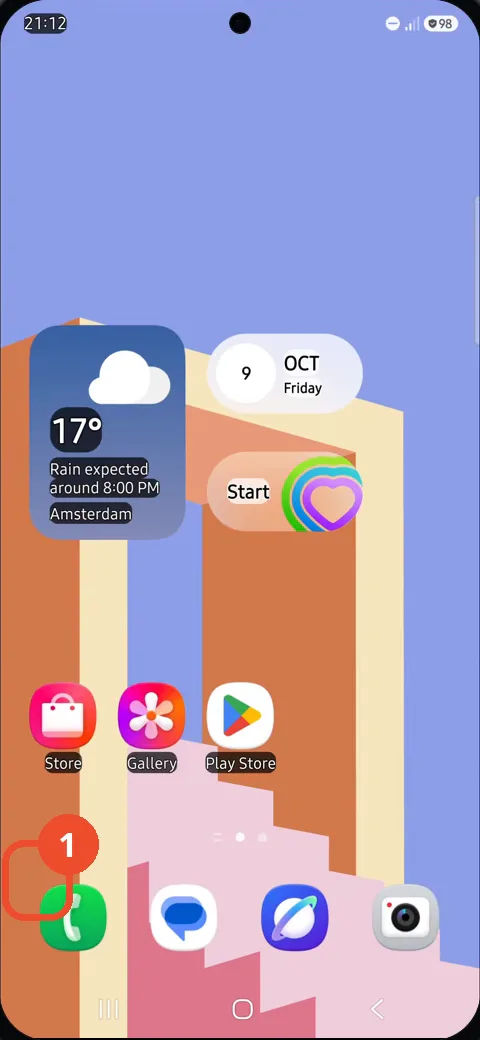
Open the Phone app
On the Home screen, tap the Phone icon in the dock.
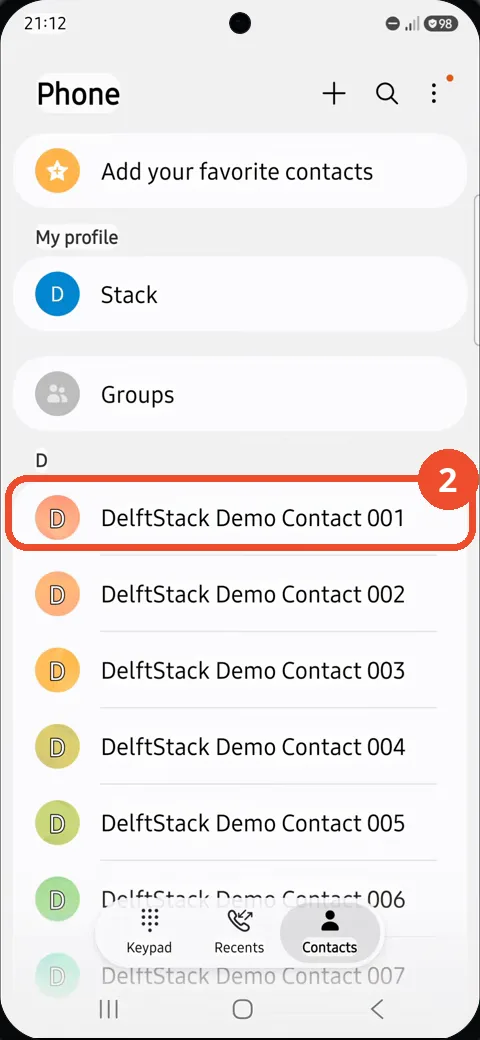
Tap DelftStack Demo Contact 001
In the contacts list, tap DelftStack Demo Contact 001.
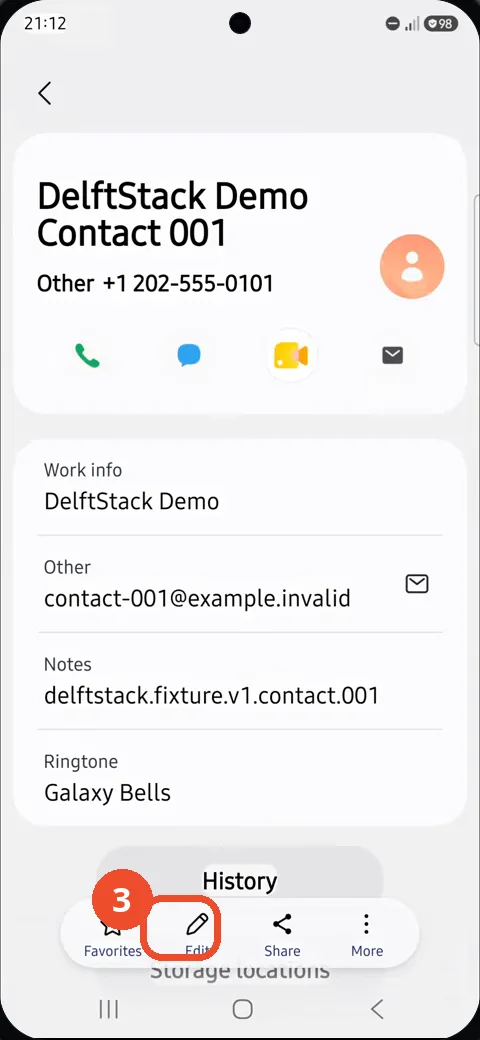
Tap Edit
On the contact’s page, tap the Edit (pencil) icon at the bottom.
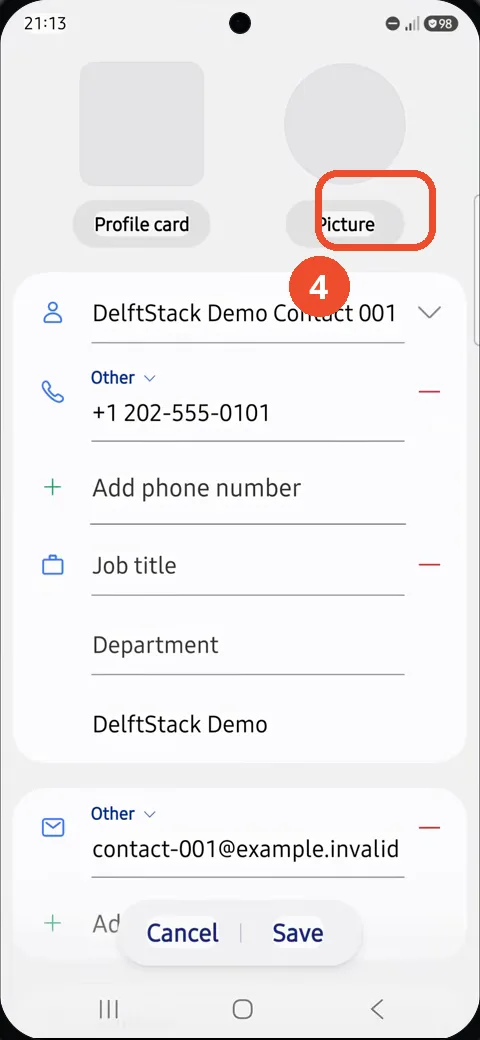
Tap Picture
In the edit form, tap the Picture tab at the top.
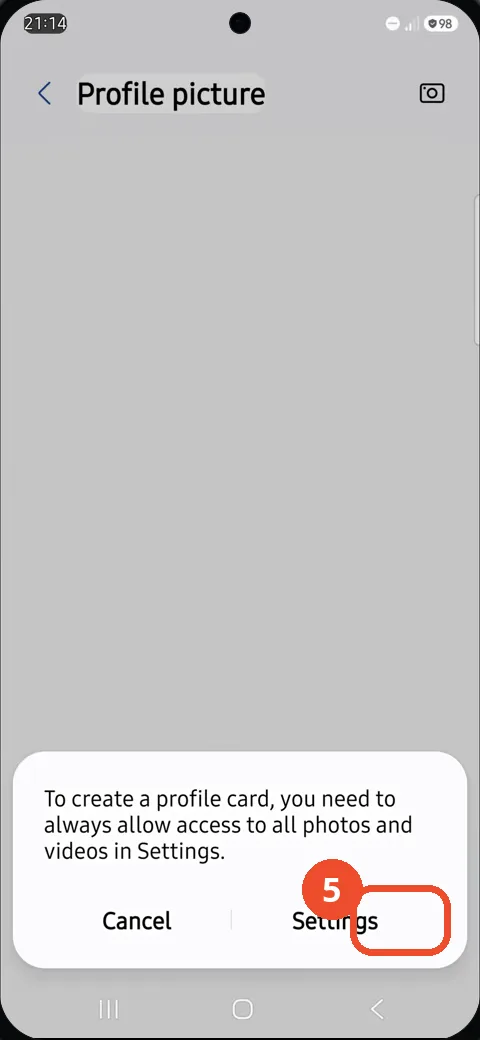
Tap Settings on the notice
Contacts asks for photo access, and with only limited access a notice says a profile card needs always-allow access. Tap Settings to fix the permission.
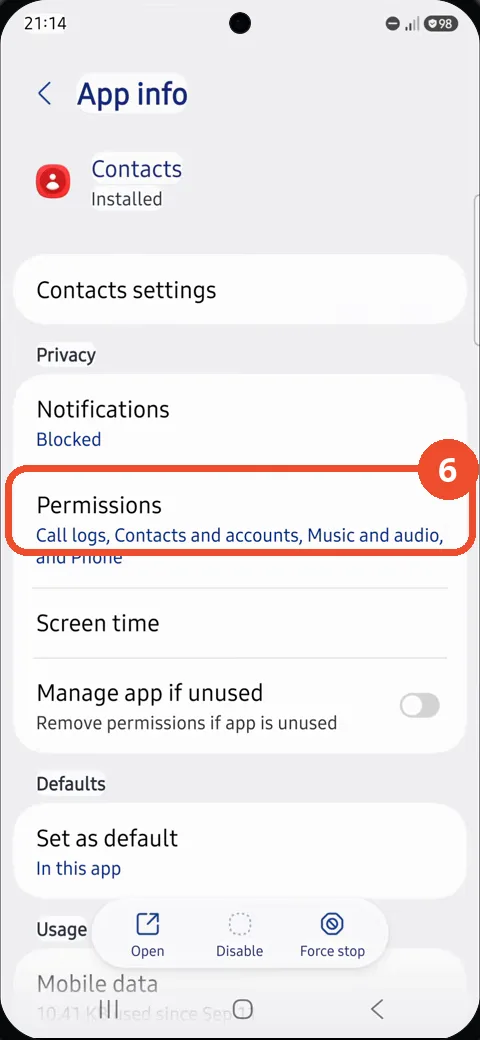
Tap Permissions
On the Contacts App info page, tap Permissions.
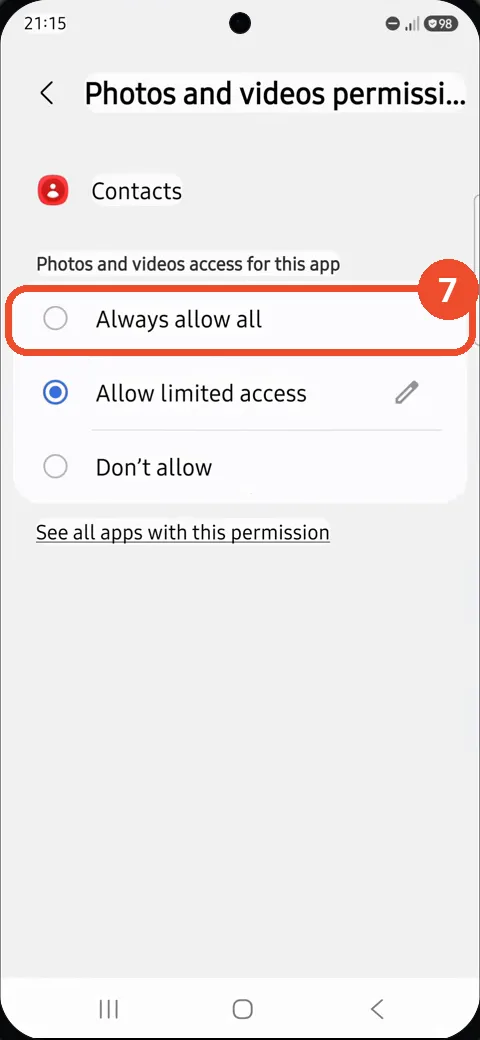
Choose Always allow all
On the Photos and videos permission page, choose Always allow all.
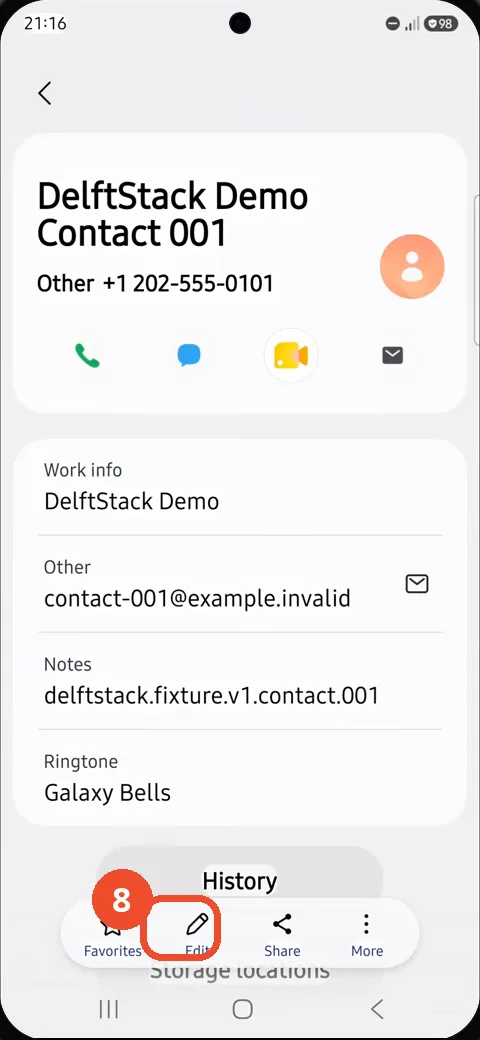
Open the contact again and tap Edit
Go back to Contacts, open DelftStack Demo Contact 001 again, and tap Edit.
Select a picture and tap Done
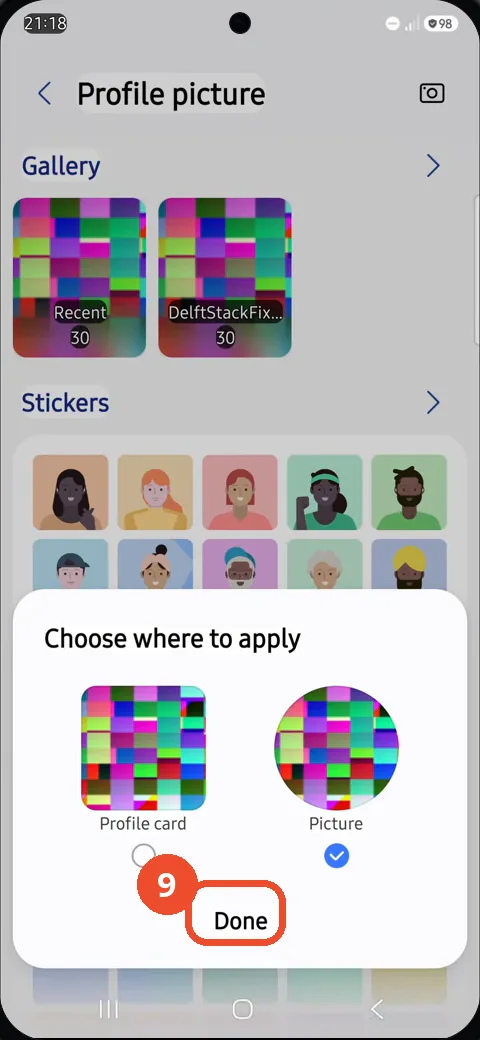
Tap Picture again, choose a picture in the Gallery, and in Choose where to apply leave Profile card unchecked with Picture selected, then tap Done.
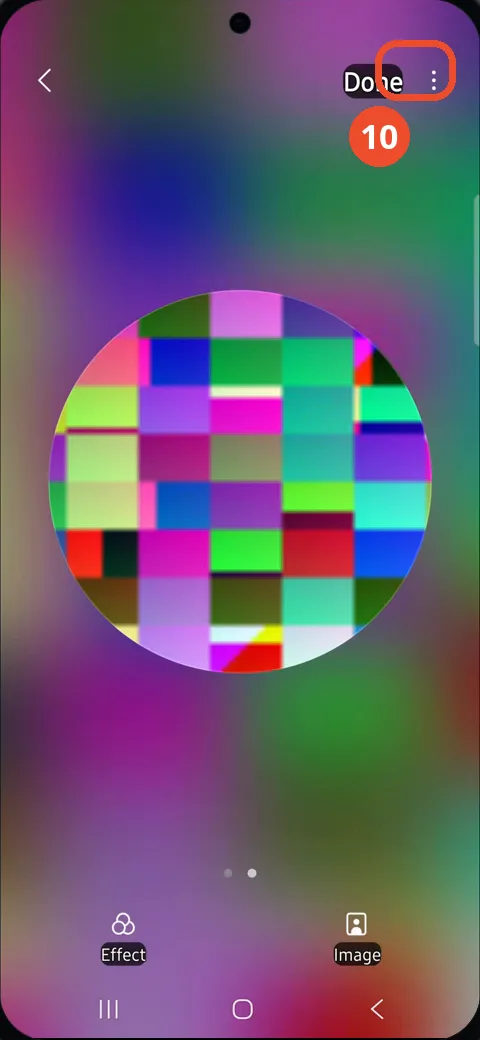
Confirm the picture
A preview shows the picture cropped into a circle. Tap Done to confirm it.
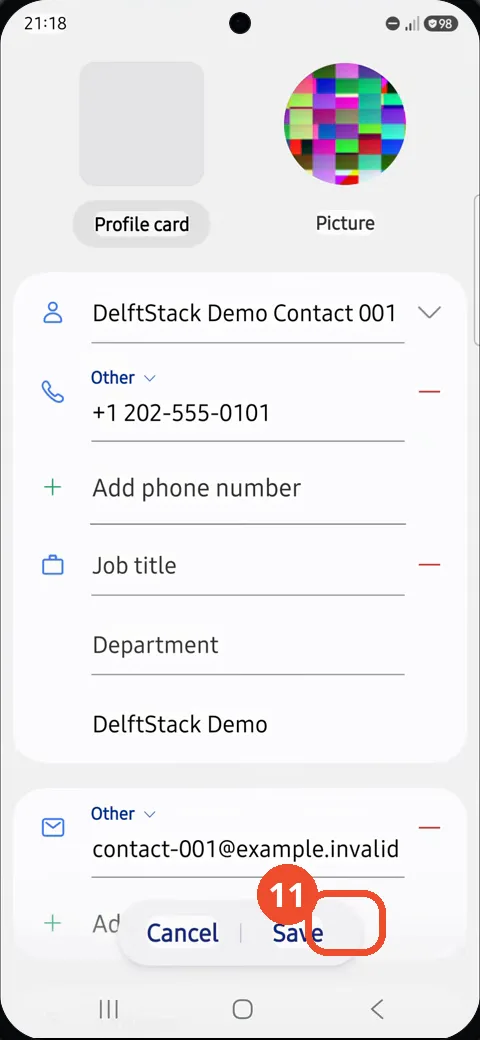
Tap Save
Back in the edit form, the contact now shows the new picture. Tap Save at the bottom.
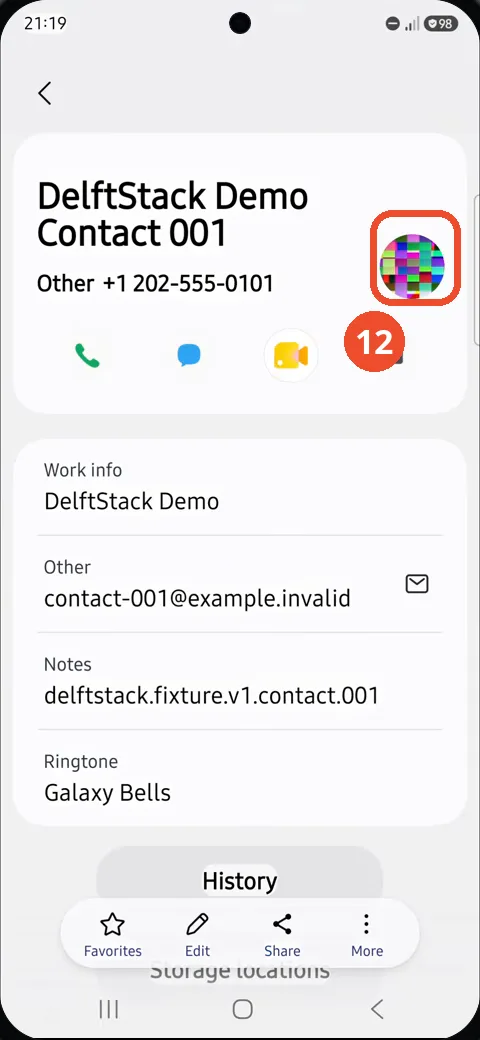
Check the updated contact photo
The contact’s page now shows the new picture at the top right. That is the confirmation.
Good to know
- The contact is a demo fixture (DelftStack Demo Contact 001) with a fictional 555 number and an .invalid email address — no real contact is used.
- The first attempt fails on permission: with only limited photo access, Contacts cannot use a picture, so the permission has to be set to Always allow all first.
- On the Choose where to apply sheet, Profile card is left unchecked and only Picture is selected — the photo is set as the contact picture, not a profile card (both are checked at first; the operator unchecks Profile card before tapping Done, seen at t87).
- The picture used is a colorful test pattern from the Gallery, not a photo of a person.
- Saving is real: after Save, the contact’s page shows the new picture.
- Remove the Google Search Bar on Samsung Galaxy A57
- Find Private Album in Samsung Gallery on Samsung Galaxy A57
- Set Up the Magnifier Shortcut on Samsung Galaxy A57
- Find Call Recording Settings on Samsung Galaxy A57
- Check Your Hotspot Password on Samsung Galaxy A57
- Change Notification Sound on Samsung Galaxy A57
- Change Font Size on Samsung Galaxy A57
- Check Multi Control on Samsung Galaxy A57
- How to Enable Autocorrect on Samsung Galaxy A57
- How to Turn On the Flashlight on Samsung Galaxy A57
- How to Change Keyboard Layout on Samsung Galaxy A57
- How to Change the Lock Screen Clock Style on Samsung Galaxy A57
- How to Check and Enable NFC on Samsung Galaxy A57
- How to Change Your Ringtone on Samsung Galaxy A57
- How to Open the Power Menu with the Side Button on Samsung Galaxy A57
- How to Block Calls from Unknown Numbers on Samsung Galaxy A57
- How to Change Font Style on Samsung Galaxy A57
- How to Check the First Used Date on Samsung Galaxy A57 with One UI 8.5
- How to Enable Autofill Codes by SMS on Samsung Galaxy A57 with One UI 8.5
- How to Find the Default Launcher Setting on Samsung Galaxy A57 with One UI 8.5
- How to Change App Icon Size on Samsung Galaxy A57 with One UI 8.5
- How to Turn Touch Feedback On or Off on Samsung Galaxy A57 with One UI 8.5
- How to Find the Swipe-Down Notification Setting on Samsung Galaxy A57 with One UI 8.5
- How to Block Spam Calls on Samsung Galaxy A57
- How to Enable Motion Photo on Samsung Galaxy A57 with One UI 8.5
- How to Change Screen Brightness on Samsung Galaxy A57 with One UI 8.5
- How to Draw on Photos in Samsung Gallery on Samsung Galaxy A57 with One UI 8.5
- How to Choose the Game Booster Shortcut Bar on Samsung Galaxy A57 with One UI 8.5
- How to Manage Messages Bubbles on Samsung Galaxy A57 with One UI 8.5
- How to Use the Magnification Shortcut on Samsung Galaxy A57 with One UI 8.5
- How to Turn on Sound Mode on Samsung Galaxy A57 with One UI 8.5
- How to Use Accessibility Shortcuts on Samsung Galaxy A57 with One UI 8.5
- How to Check Battery Health on Samsung Galaxy A57 with One UI 8.5
- How to Enable Floating Windows on Samsung Galaxy A57 with One UI 8.5
- How to Change Display Size on Samsung Galaxy A57 with One UI 8.5
- How to Enable Silent Mode on Samsung Galaxy A57 with One UI 8.5
- How to Check Call Screening on Samsung Galaxy A57 with One UI 8.5
- How to Choose Automatic System Update Downloads on Samsung Galaxy A57 with One UI 8.5
- How to Enable Dark Mode on Samsung Galaxy A57 with One UI 8.5
- How to Force Stop an App on Samsung Galaxy A57 with One UI 8.5
- How to Find an App on Samsung Galaxy A57 with One UI 8.5
- How to View Downloads on Samsung Galaxy A57 with One UI 8.5
- How to Find PIN Setup Options on Samsung Galaxy A57 with One UI 8.5
- How to Find Predictive Text in Samsung Keyboard Settings on Samsung Galaxy A57 with One UI 8.5
- How to Close All Tabs in Samsung Internet on Samsung Galaxy A57 with One UI 8.5
- How to Find the Manual Time Settings on Samsung Galaxy A57 with One UI 8.5
- How to Enable Dolby Atmos on Samsung Galaxy A57 with One UI 8.5
- How to Add Lock Screen Text on Samsung Galaxy A57 with One UI 8.5
- How to Connect Samsung Galaxy A57 to Wi-Fi on One UI 8.5
- How to Turn On Reduce Animations on Samsung Galaxy A57 with One UI 8.5
- How to Change the Home Screen Grid on Samsung Galaxy A57 with One UI 8.5
- How to Zoom with Camera Volume Buttons on Samsung Galaxy A57 with One UI 8.5
- How to Manage Password Autofill Settings on Samsung Galaxy A57 with One UI 8.5
- How to Find Mobile Hotspot Settings on Samsung Galaxy A57 with One UI 8.5
- How to Enable Dual Messenger on Samsung Galaxy A57 with One UI 8.5
- How to Turn Off RCS Chats on Samsung Galaxy A57 with One UI 8.5
- How to Find Google Lens on Samsung Galaxy A57 with One UI 8.5
- How to Find Home Button Order Options on Samsung Galaxy A57 with One UI 8.5
- How to Manage App Notifications on Samsung Galaxy A57 with One UI 8.5